
The G.A.T. >:3
A downloadable tool for Windows, macOS, and Linux
The freedom to add more chaos to your projects!
The General Animation Texture (or buffer, as it actually is on the compute-side), is a way to share hierarchical rigs and animations across meshes and LODs with blazing performance.
The GAT takes all the stuff related to making things move (such as skinning), and moves it to the GPU-side using compute shaders and indirect instancing. The benefits are much less CPU-GPU communication, and more processing power available on the CPU for all your other needs, like audio, gameplay, multiplayer, and so on and so forth. :3
Features
The GAT comes with many features to make it easy to start translating your imports into the internal GAT-buffer formats. The idea is to have it as usable as possible for non-technical users to test and get some results, while saving time on the mundane parts like setting up.
- Dual Quaternion Skinned joints
- Automagic import of .FBX to GAT (buffer)
- Automagic detection of partial animations (masking)
- Automagic detection of looping animations
- Automagic range-based uniform frame reduction
- Animations can have different frame intervals
- Animation playback synching across speeds and length
- Animation processing done in compute kernels
- Animation clip import from existing animation clips
- 4 animations at 3 samples per joint
- 3 sequential animations with seamless interpolation
- 1 override for the interpolations
- Custom animation transition timers
- Import and export of animation data to JSON
Planned features
Here are some planned features for the future, which can happen based on demand, and by working with one of you. If you see a feature you'd like to add, please let us know!
- Support for other formats than .FBX (.GLB, .OBJ, .USD, etc.)
- Mirrored animations (swapping L/R of symmetric rigs)
- Mecanim converter (Unity only)
- Node-based animation blend editor
- Blendshapes/morphtargets
- Animation events/Keyframe logic (CPU-side)
- Entity gathering for non-technical playback setup
- Pre-multiplied vertices per joint
- .PNG-export for custom "VAT-like" integrations
- 1 additional override for animations
- Inverse Kinematics, both override and default
- Grid-based LOD
Improvements
There are also some things that will be improved in the future release(s) of the GAT, such as:
- Reduced JSON-size
- Better material/submesh-support
- Less integration need into existing projects
- Better GPU-dispatching with less CPU-overhead
Limitations
This has been tested with up to 512000 entities with 32 joints each, however it's supposed to work with up to 65536 entities on a Nintendo Skwish or similar hardware. The recommended amount is to keep it up to 16384 entities with 32 joints each for most lower-end devices, and to avoid any issues with GPU timings in DX11. A way to look at it is to multiply the amount of entities with the amount of joints they have. That number must be kept up to 65536 for the best results.
Known issues
There could be issues with DX11/12 in Unity, please check the WDDM support for timeout detection and recovery, and report in the Community-section below when it happens. As for Unity, there are many threads on their fora, of which this one is apparently the most relevant with potential fixes.
Use Vulkan in Unity to avoid any issues with swapchains, however this might also introduce issues with the surface.shader-example, like the texture not rendering.
Compatibility is depending on support for compute shaders on the target platform. So far it's only been tested on Windows 10 and Pop!_OS.
How to install (Unity)
Open the downloaded .ZIP's contents into a folder within one of your Unity-proyects. We have tested with versions 2022.3 and 6.2, and are aware there can be compatibility issues.
The GAT requires these Unity-packages installed:
- Mathematics
- Collections
- Burst
- Jobs
Should you have any issues with the installation of the GAT, please let us know in the community-section by posting a topic upon the subject, and we will do our best to damage control address the issue(s) you might have.
How to setup (Unity)
After importing the .ZIP into your Unity-proyect, open the included TestScene to check it out. There you can go to the inspector on the character to see how it is setup.
You can controle the character in playmode with WASD for movement and Space or Left Control for override animations.
The prefab with the skinned mesh has this scripture upon it, in which you can hover over the various descriptive titles for a more elaborate description of each:
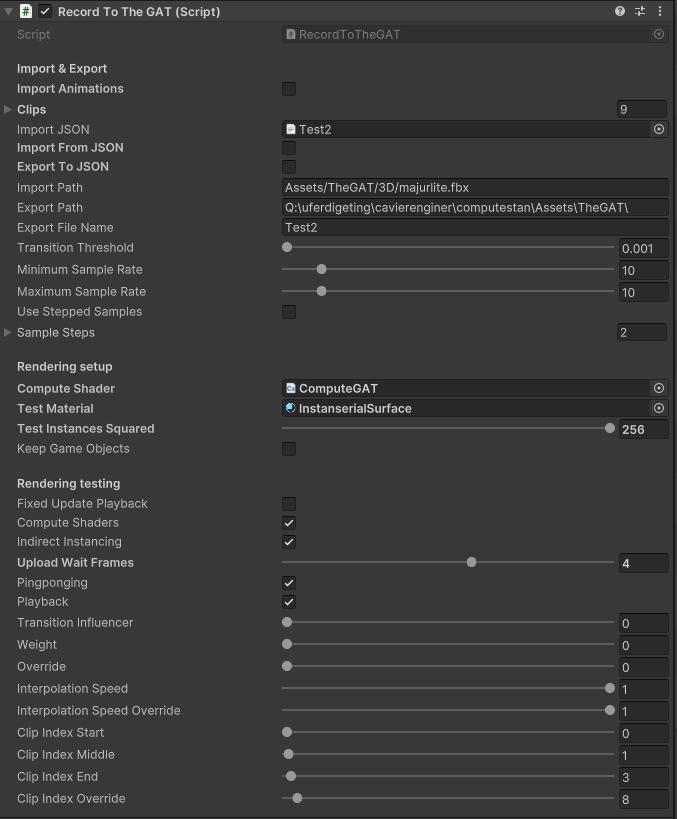
Import & Export (first section)
This section is an "offline"-preprocess that can be done in isolation so that you can get a .JSON to use as the saved animations to reuse for later. It is possible to do this on Awake() or similar when launching, but it's a lot of extra resources needed, and is not recommended for releases.
Rendering setup
This section is how to prepare for rendering by assigning materials to be used. The slider is only relevant if there are no GameObjects in the scene with IndirectDataGroup,cs-scriptures on them with relevant rendering data.
Rendering testing
This is while running the test in playmode. Choose between the different settings to find what works best for your hardware setup and needs. Usually a higher Upload Wait Frames scales better for more entities on the screen, but results in more delay when uploading input and locational data from a CPU to a GPU.
Animation testing
A lot of options for the animation playback to test the animations that have been imported and how they behave. This is important to find any issues with the import settings and blending, so that the best possible quality animation can be used for the final JSON-exported result.
The Clip-indices work as follows:
- Clip Start, Middle, and End, work in sequence. Useful for going from idle to walk and then run, in a linear interpolation with animation syncing.
- Clip Override is the clip to overrride the sequence. It works as a mask, so it only overrides the joints that have motion. If only parts of the recorded animation has motion, only those will override the sequence. Useful for having a limb do something else, or toggling attack modes or something.
Here are some examples of how this looks:
How to use the API (Unity)
This is for technical users who have programmed beyond telling some "llm" to build app in "one shot" (or whatever lingo they are hallucinating). All functions are commented in the code for a slightly better understanding of what they do.
Main API-functions
Here is an example of how the testing scripture uses the main public functions available from the RecordToTheGat.cs-scripture:
- MakeJSONData(string importPath, string exportPath)
- Makes JSON-data from the animation import.
- It's mostly to be called offline while in the editor, often through an inspector view interface or similar button, outside of playmode and the built environment.
- This needs both a functioning import path and export path:
- The import path is usually where the file itself is, like the absolute path to an .FBX-file like: "c:\file3D.fbx"
- The export path is where the JSON-file will end up. The ".JSON"-part of the path is included so you don't have to add it.
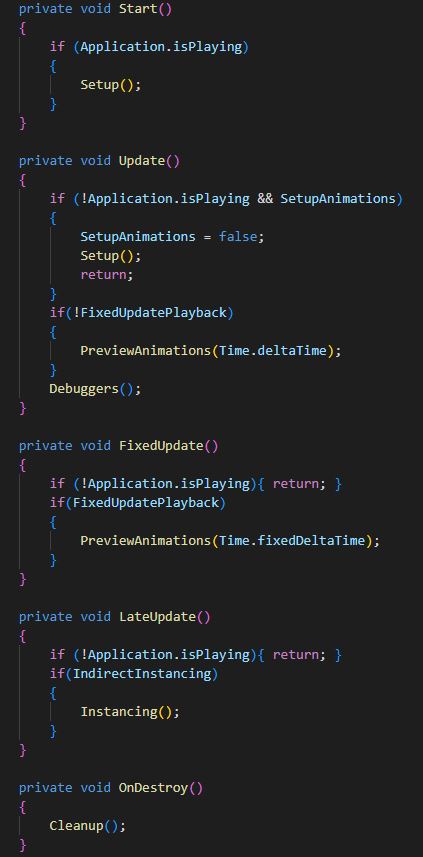
- Setup()
- Sets up the animation import, export, and the associated GPU-ploadable data.
- Best to call it in Awake(), Start() or even OnEnable(), if you can afford the milliseconds in waiting time.
- PreviewAnimations()
- Previews the animations upon the GPU in playmode or similar. Must be called from Update() in most cases. Can be called from FixedUpdate() AT YOUR OWN RISQUE...
- Debuggers()
- If you want to see the extents of the imported animations displayed as coloured debug lines.
- Instancing()
- Shows the instances. This is best called in LateUpdate() or something similar according to a Unity-documentation or so...
- Cleanup()
- MUST BE CALLED!
- Cleans up all data that must be cleaned up BEFORE the application is shut down to avoid memoir leaks, usually within OnDestroy(). If inappropriately uncalled for, might make life a little bit more difficult.
Other API-functions
If you desire more controle, these functions will help with setting up a more detailed animation playback system:
- Dispatching(float deltaTime)
- Dispatches the compute shaders needed to make the GAT run as intended. Can be called from Update() or FixedUpdate() (if you dare).
- The deltaTime is something like the delta between each frame in the Update() and FixedUpdate()-functions, like Time.deltaTime and Time.fixedDeltaTime respectively. You can scale them however you want, however.
- SetupIndirectBuffer(int instanceID, uint instances, int joints, IndirectInDataGroup dataGroup, SkinnedMeshRenderer skinner, ComputeBuffer objectsToWorld, Material material)
- Sets up an indirect buffer, and returns an IndirectInData-struct to be used with Instancing().
- This has a lot of parameters so refer to the in-code documentation by hovering over the function for further deets.
- RecordAnimationClips(AnimationInstance instance, int joints, int counter)
- Records animations based on existing AnimationClips to the associated buffers of an AnimationInstance. Returns an updated AnimationInstance with the AnimationClips amended. If no clips, will leave as-is.
- This needs an AnimationInstance, a joint-amount, and a counter:
- The instance is which instance to add the AnimationClips to.
- The joints are how many to use, usually set to the same number of "bones" in the rig.
- The counter is how many clips to record. Usually it's <= total amount of clips.
- OverrideInstanceInputs(OPTIONAL int animationInstanceIndex, OPTIONAL int inputsIndex, OPTIONAL int locRotIndex)
- Overrides a specific instance's inputs with animation playback and location and rotation before it gets loaded up to a GPU. Used with startOffset in Dispatching().
- This takes three optional arguments:
- The animationInstanceIndex is the index of the AnimationInstance to be overridden.
- The inputsIndex is the index of the indirect instance that will have its inputs overridden.
- The locRotIndex is the index of the indirect instance that will have its location and rotation overridden. The position and rotation are based on the Transform the RecordToTheGat.cs-scripture is attaught to.
There are two arrays used by all of these functions that are publicly accessible:
- AnimationInstances[]
- For the animation data.
- ComputeInstances[]
- For the compute shader data.
If you want to have frequent updates to the GPU from the CPU, you can make a Jobs-based implementation similar to how it's done for the test script, as shown here:
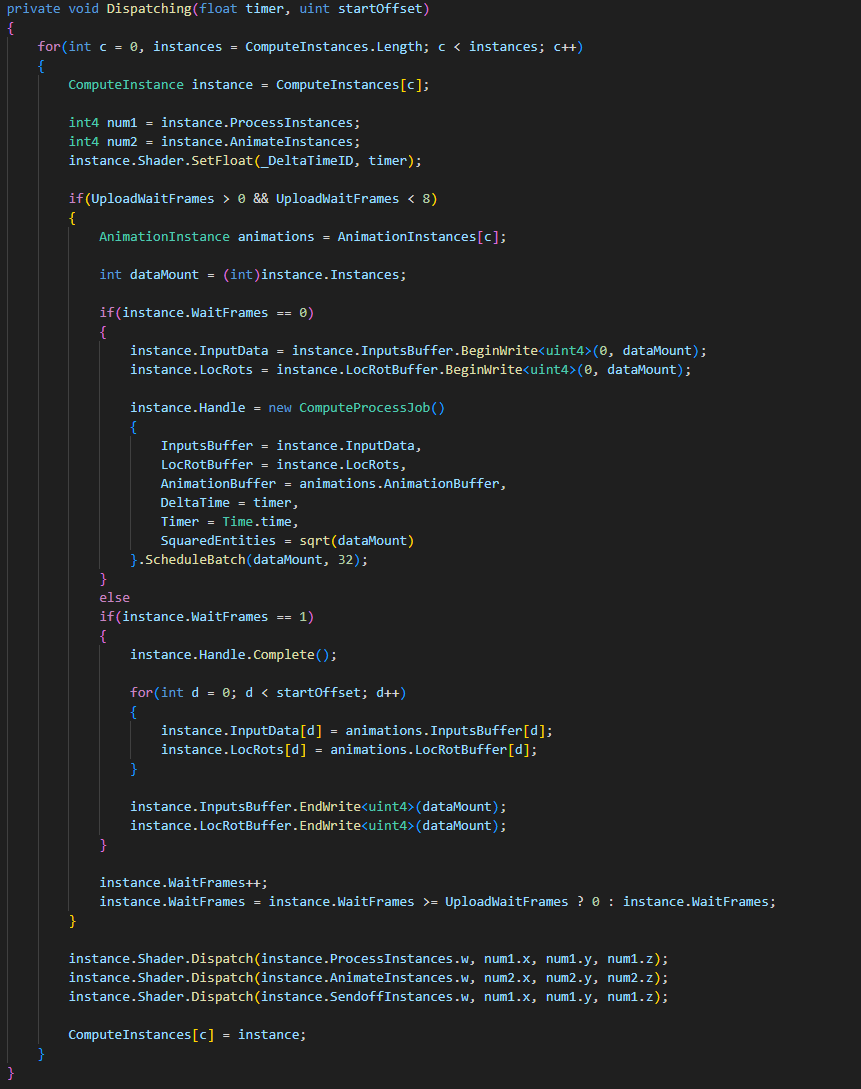
Please refer to common best-practices for CPU-GPU communication when updating a lot of entities at the same time. Sometimes it can help to double or triple the buffers, even though it also doubles or triples the amount of data. Always profile for limitations and trade-offs.
Licencing
The usage of a purchased downloadable working version of The GAT varies depending on size and scope of the operations it will be used within, with two main categories:
- Small break-even entities or solo developers
- Medium+ and/or profitable entities
1. Is usually a company with less than 10 employees starting out, bootstrapped and with little available money. It can also be existing companies that are barely economically sustainable who are testing things out without economical success. Solo developers tend to be experimenting with a lot of different technologies across many smaller-scoped projects.
A licence for 1. means a licence can be used across all projects and shared between all users.
2. Is usually a company that has over 10 employees that is economically sustainable, and/or has received significant economical support through investments and/or sales revenue. The key point is being successful according to some arbitrary KPI-like metric that the company has achieved, often economic.
A licence for 2. means a licence is per-project, per-seat, and cannot be shared.
The FAQ
"Why?"
To get more animated entities on screen at the same time. The GAT addresses some performans-issues (con)currently in game engines such as Unity, that do a lot of work on the CPU-side that is a better fit on the GPU due to the rampant advances in GPGPU and compute shaders.
"How do I use it?"
Try reading the documentation above on how to set it up. There should be sufficient details on how to make it work if you read the guide.
"I still don't understand... How do I use it?"
Make a post in the community section below if you have problems beyond the setup or if the setup is unclear, pointing to exact steps that made it unclear. If after getting a more detailed explanation with more detailed steps or an alternate explanation is not enough, maybe this isn't for you. It's ok.
"Why won't it work?"
There might be some incompatiblity issues or something went wrong at some point of the integration and testing. Please make a post in the community section detailing the steps you took to integrate it into your project and what you expected and what actually happened.
"When are you going to release for store/platform/engine X?"
The plan is to have it released on the Unity Ahhet Store next, and then for Unreal Engine and Godot, in whichever order makes the most sense based on demand. For now itch.io provides the best place for an entrypoint to bring this out. As for custom engine integrations, the compute shader is done in HLSL for DX11,. If you're using Vulkan with HLSL it should be possible to integrate without too much work.
"Why does offering X do something exactly like this but better!?"
They are close, but not identical to this solution. One being the hierarchical animation blending with override. The biggest advantages are in the future when it will interface with the other offering from the Cavia Project, like the Creation System, Digital Molecular Matter, and Modrokkr. By being an early adopter you will have an easier way in, and a more all-rounded suite of tools to help you get better results even faster.
"Why should I buy now when it will be improved later, I'll just wait for that instead!"
Unfortunately if not enough people buy it, it won't be improved for later. Some early adopters are needed to ensure work continues. To help with this, the first release(s) will be heavily discounted.
"When are you gonna open source it?"
When it has paid for itself. Until then parts can be open sourced for integrational demands, R&D, and similar, under approval. However, there's nothing that will stop a good reverse-engineer.
"There are so many other alternatives out there, what makes this stand out?"
Hopefully the combination of pricing, support, features and performance will make it stand out against the others. The rest will be up to you to decide.
"How do I improve the performans?"
Profile for bottlenecks as much as you can. Usually it will be related to cascaded shadows and the CPU-GPU-transfer. Increase Upload Wait Frames, turn off cascaded shadow maps, use less detailed 3D-models, and check material properties if you are using a custom material.
"Uhhhhh, it crashed... what now?"
Please file a bug report in the Community-section below by creating a new topic and provide some details surrounding when it crashed and if/how it is possible to reproduce. The more likely it is to reproduce the higher it will be prioritised.
"Why are the animations so ch'ouw'p-peeh?"
Choppy animations can come from the frame intervals between the two blended animations being too different. If one is at 30FPS and the other is at 17FPS they cannot find a common denominator, and only the 30FPS one will be matching a target framerate of 60, and be divisable by 2. Ensure that animation clips have a common denominator for division to avoid choppiness upon blending. Use Stepped Samples if you d e s i r e more control.
"Why is the imported 3D-file all wrong?"
Check scale factors, orientations, and selected animation clips. The scale should be 1 on import, and there should only be 0 in orientations in XYZ. You might have to enforce explicit keyframe export or check/uncheck a few options in programmes (like Blender) to ensure the NLA-strips get exported properly. Please check with the available documentation for import-export issues.
"Why do you call it 'joints' like that?"
Because they could be hinges, bones, corners, etc. as not all rigs are humanoid or belonging to the animal kingdom. If there is better terminology, please tell.
"What will you do if I just decide to leave a bad review for the sake of it?"
It happens so often to me that I am getting kind of numb to this, but thank you for the purchase. The money will be spent on making it better. (I really don't understand why someone would buy this just to review-bomb...)
Credits
Thank you so much to all the people who have helped out on making this a reality! :3
Some especial thanks go out to:
- Devaniti for half/float-conversion issues.
- Daniel Motilla for testing and .DLL.
- Nano for 3D-models and testing.
- Jebrim for why it's using compute shaders.
- Alexander Bakanov for the R&D.
- Sebify for Unity-assistance.
- Zalo for library, shaders, and maff.
- LooperVFX for DX-debugging.
Purchase
In order to download this tool you must purchase it at or above the minimum price of $25 USD. You will get access to the following files:
